Thursday 7 June 2012

Clean lenses installed !

My clear indicator lamp covers and oil filters that I ordered onlinbe is finally here.  It was an easy job to unscrew the old apek red and orange covers out and replace the bulbs with LED before screwing in the new clear lenses. Looking nice.


One thing about the LED indicatot lights is that, They are too bright and in blue tone that make the yellowish head lights look even old so I guess I'm changing the headlight to something white lah . Considered HID but I don't want to be pulled over each time I come across a road block, or have to feed any starving officers coffee before/during/after some national holidays. What to do leh? LED head light  legal or not ah?


Meanwhile, waiting for my NAS style LED back lights to be arrived.

Kaki baru !

I was lucky enough to have this very good offer from a fellow gila landy, a pair of adjustable Rancho RS9000 front shocks (dampers)!

Although the original set of shocks were new as the previous owner had them replaced during restoring, I decided to keep the front pair as spare and fit in the RS9000. Itchy butt la.

While I'm there, I thought I might as well service and re-paint the brake callipers, clean the pistons and fit in new pads too. Bled the old brake fluid as seen manual and refilled it to the top.


I also had the hub bearings re-greased and tighten as well since I was in there.

Then came the harder part. The shocks! After reading articles on line about it, I've came prepared knowing how much work it is, and aware of it wasn't going to be easy.

You can read the useful article here at landyzone

But you know we boys lah, when we kee shiao (get crazy),  no matter how hard it is we also can find ways to accomplish the mission!

After hours of screwing in and our, banging, cave diving and a lot of  cursing over the 2 days works...It's finally fitted in.
The passenger side was an easier treat (but not any easier!) , but the driver side.. You'll have to take out a lot of things like the coolant reservior before gaining access to the tower...which was a bitch in life!!!


I have them set on the hardest as I mostly drive the car to work in town, tested it and it really improved the handling a lot, compared to the softer ori shocks which are meant for heavy load. 
Very smooth drive! I'm really happpy with it and thinking of getting another pair for the rear very soon after selling my balls

By the way, think I'll try to re-tighten swivel bearing of the swivel hub
(Botak/Monk Head as Derek called it) and reset the preload value tonight this weekend..

Soon la


The interior pimp-up

When i got my landy, the condition of the interior was as expected - old and tired, but it wasn't as bad.
A little ( a lot actually ) works and efforts was expected to put to make it looks better and comfortable.
So the past few weekends' project was to pimp up the interior as comfortable as it can be..


Check list 1. Gotta pimp those door panels.
The door panals looked old and colour faded. There's even one with discolouration. Not sure it was replaced before, or just faded over the years. Planned to spray paint them as I was going to spray paint the trimming as well, but thinking I might as well use 3M carbon stickers to cover the whole thing,
making it looks new. Save the sand-papering. It was done over 2 nights and the outcome :

Added in some carpet trimming for a more modern looks.


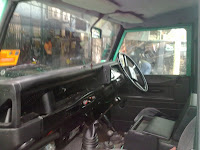
Check list 2. Gotta pimp up the dashboard.
If you have been in a defender before, you'll have the idea. The dashboard of a typical defender is, simple, and simple it is. It's so simple that you even wonder if the LR Silhoul facility actually built them with craps that they found in scrapyards. It's so simple that if you'd like to fit an audio in, you'll have to buy a box like house to fit in, or build yourself one - then figure out where you wanna fit it!
 And Air-conditional Was Optional!!

So there's a lot to do after taking it aparts:
1. Re-painting the parts suh as ashtray, heater air vent, console panels.
2. Clean up, servicing, painting the gauge rings in silver and fitting in new LED bulbs.  
3. Sound/heat proofing the bulkhead from the inside, with polymoulds stole I got from work.
4. A lot of water-proofing silicone works!
5. Building a centre console and fit in a LCD audio, reverse camera coming soon.
6. Building an aircon duct to re-route it from passaanger side to the middle, TD5 style.
7. Redo wiring as musch as I can.
8. Fix or try to fix anything broken, including the arm-rest console, Mcgyever style!

Taking all apart !!

  Dashboard re-painted. Centre console and aircon duct on it's way.


Check list 3. Gotta redo the interior triming:
So far for this I have done:
1. Taken out interior panals and re-painting them in gray.
2. Refitting the front and 2nd roll passanger seats.
3. Carpetting (half way done)
4. New padels.

What I've gotten so far..


To be added in soon are:
- Roof console for the fuses to move in, and to fit in radio.
- Momo steering
- Waiting for my reverse camera
- More spound-proofing and carpeting.
- Re-check the water ingress of the roofing, fill any gap found with putty/sillicon.

Mmm that's about it. Stay tuned.